de - konfigurationsanleitung en - configuration instructions
TRANSCRIPT
© T
unst
all G
mbH
, O
rkot
ten
66,
4829
1 T
elgt
e,
Ge
rman
y, w
ww
.tuns
tall.
de
DE - Konfigurationsanleitung EN - Configuration Instructions
ComStationCT Flamenco, Best.-Nr. 77 0606 00Terminal in Gegensprechtechnik, vorgesehen zur Tischaufstellung am Dienststützpunkt, inkl. roter Ruftaste, blauer Alarmtaste, grüner Anwesenheitstaste (AW1), gelber Anwesenheitstaste (AW2), 4 Funktionstasten mit situations-abhängiger Belegung, Mikrofon und Lautsprecher.
ComStationCT Flamenco, order no. 77 0606 00Terminal with two-way speech communication, designed for desktop installation in the nurse station, incl. red Call Key, blue Alarm Key, green Presence Key (staff 1), yellow Presence Key (staff 2), 4 Function Keys as soft keys, microphone and loudspeakers.
Hinweis! Die vollständige Installation der Rufanlage ist im Technischen Handbuch beschrieben.
Vorsicht Glas – Zerbrechlich ! Die Bedienfront der ComStationCT besteht aus Glas und kann brechen.
NOTE! The complete installation of the nurse call sys-tem is described in the Technical Manual.
Glass – fragile! The operating front cover of the Com-StationCT is made of glass. Handle with care!
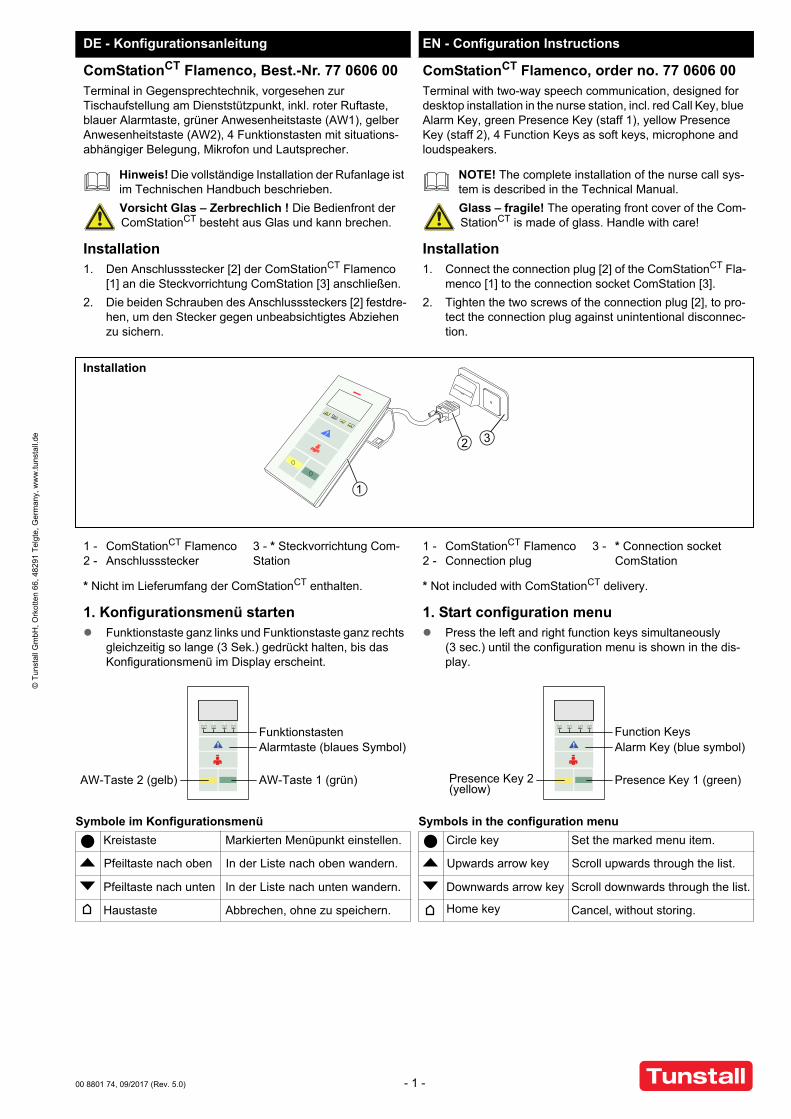
Installation1. Den Anschlussstecker [2] der ComStationCT Flamenco
[1] an die Steckvorrichtung ComStation [3] anschließen.
2. Die beiden Schrauben des Anschlusssteckers [2] festdre-hen, um den Stecker gegen unbeabsichtigtes Abziehen zu sichern.
Installation1. Connect the connection plug [2] of the ComStationCT Fla-
menco [1] to the connection socket ComStation [3].
2. Tighten the two screws of the connection plug [2], to pro-tect the connection plug against unintentional disconnec-tion.
1 - ComStationCT Flamenco2 - Anschlussstecker
3 - * Steckvorrichtung Com-Station
1 - ComStationCT Flamenco2 - Connection plug
3 - * Connection socket ComStation
* Nicht im Lieferumfang der ComStationCT enthalten. * Not included with ComStationCT delivery.
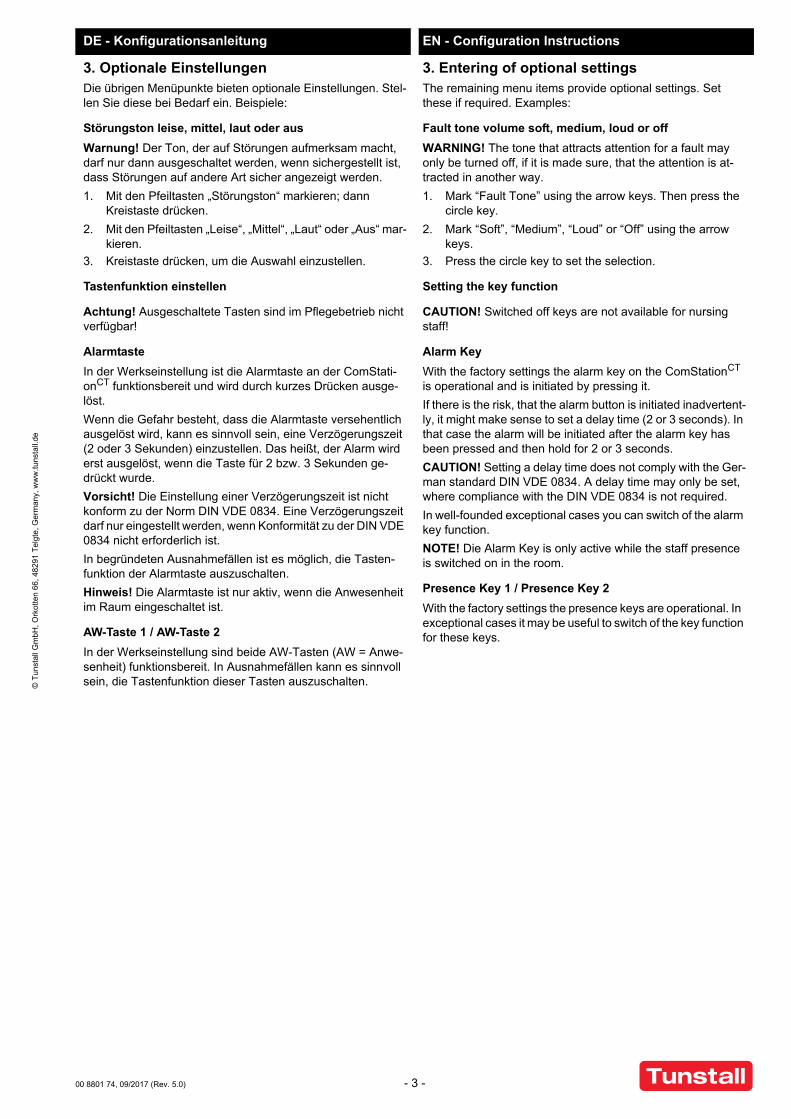
1. Konfigurationsmenü starten Funktionstaste ganz links und Funktionstaste ganz rechts
gleichzeitig so lange (3 Sek.) gedrückt halten, bis das Konfigurationsmenü im Display erscheint.
1. Start configuration menu Press the left and right function keys simultaneously
(3 sec.) until the configuration menu is shown in the dis-play.
Installation
3
1
2
Symbols in the configuration menu
Downwards arrow key Scroll downwards through the list.
Home key Cancel, without storing.
Upwards arrow key Scroll upwards through the list.
Circle key Set the marked menu item.Symbole im Konfigurationsmenü
Pfeiltaste nach unten In der Liste nach unten wandern.
Haustaste Abbrechen, ohne zu speichern.
Pfeiltaste nach oben In der Liste nach oben wandern.
Kreistaste Markierten Menüpunkt einstellen.
Alarmtaste (blaues Symbol)
AW-Taste 1 (grün)
Funktionstasten
AW-Taste 2 (gelb)
Alarm Key (blue symbol)
Presence Key 1 (green)
Function Keys
Presence Key 2 (yellow)
00 8801 74, 09/2017 (Rev. 5.0) - 1 -

© T
unst
all
Gm
bH,
Ork
otte
n 66
, 482
91 T
elgt
e, G
erm
any
, w
ww
.tun
stal
l.de
DE - Konfigurationsanleitung EN - Configuration Instructions
Menüpunkte
Sprache: Sprache der Displaytexte einstellen.
RAN > RAN Anzahl: Anzahl Zimmergeräte (= RAN Anzahl) einstellen.
RAN > Test RAN: Test, ob Zimmergeräte funktionsbereit und korrekt am RAN angeschlossen sind.
RAN > Status: Prüfung, ob eingestellte RAN Anzahl mit Anzahl funktionsbereiter Zimmergeräte übereinstimmt.
Adresse: Zimmer-Adresse einstellen.
Reinigungszeit: Sekunden einstellen, die benötigt werden um die Front der ComStationCT abzuwi-schen.
Kontrast: Nur für Tunstall-Techniker.
Tastenton: Ton bei Drücken der Tasten an der Com-StationCT ein- oder ausschalten. „Tasten-ton EIN“ (Werkseinstellung) wird empfohlen.
Störungston: Lautstärke des Tons beim Auftreten einer Störung einstellen.
Info: Revision der Software in der ComStati-onCT anzeigen lassen.
Audio Test: Verwendung durch Tunstall-Techniker.
Tastenfunktion: Funktion der Alarmtaste und der Anwe-senheitstasten an der ComStationCT ein-stellen.
Reset: Verwendung nur durch Tunstall-Techni-ker. (ComStationCT neu starten)
Menu items
Language: Selecting the user language.
RAN > RAN number: Setting of number of room devices (= RAN number).
RAN > Test RAN: Test if room devices are ready to operate and if they are correctly connected to the RAN.
RAN > Status: Check whether the stored RAN number is equal to the number of operational room devices.
Address: Setting of room address.
Cleaning time: Setting the time (seconds) how long it takes to wipe the front of the ComSta-tionCT.
Contrast: Function use only for Tunstall technicians.
Key sound: Switching the key sound on or off. “Key sound ON” (factory setting) is recom-mended.
Fault tone: Setting the fault tone volume.
Info: Displaying the ComStation's software revi-sion.
Audio Test: Function use only for Tunstall technicians.
Key Function: Setting the function of Alarm Key, Pres-ence Key 1 and Presence Key 2 on the ComStationCT.
Reset: Function use only for Tunstall technicians. (Restart the ComStationCT).
2. Zwingend erforderliche Einstellungen
Sprache einstellen
1. Mit den Pfeiltasten „Sprache“ markieren; dann Kreistaste drücken.
2. Mit den Pfeiltasten gewünschte Sprache markieren: D = Deutsch, GB = Englisch usw.
3. Kreistaste drücken, um die Auswahl einzustellen.
RAN-Anzahl einstellen (0 – 30)
RAN Anzahl = Anzahl Zimmergeräte (Taster, Steckvorrichtun-gen, Zimmerleuchten etc.), die über RAN angeschlossen sind (Kein Birntaster, keine PBK Hand).
1. Mit den Pfeiltasten „RAN“ markieren; dann Kreistaste drü-cken.
2. Mit den Pfeiltasten „RAN Anzahl“ markieren; dann Kreistaste drücken.
3. Mit den Pfeiltasten RAN-Anzahl des Zimmers markieren.
4. Kreistaste drücken, um die Auswahl einzustellen.
Zimmer-Adresse einstellen (0 – 110)
1. Mit den Pfeiltasten „Adresse“ markieren; dann Kreistaste drücken.
2. Mit den Pfeiltasten gewünschte Adresse markieren.
3. Kreistaste drücken, um die Auswahl einzustellen.
2. Entering of necessary settings
Selecting the user language
1. Mark “Language“ using the arrow keys. Then press thecircle key.
2. Mark the desired language using the arrow keys: D = German; GB = English, etc.
3. Press the circle key to set the selection.
Setting of RAN number (0 – 30) (Room Area Network)
RAN number = Number of devices in the room (switches, con-nection sockets, room lamps, etc.) that are connected via RAN. (No pear push switch, no patient handset).
1. Mark “RAN” using the arrow keys. Then press the circle key.
2. Mark “RAN number” using the arrow keys. Then press the circle key.
3. Mark the desired RAN number using the arrow keys.
4. Press the circle key to set the selection.
Setting of room address (0 – 110)
1. Mark “Address” using the arrow keys. Then press the cir-cle key.
2. Mark the desired room address using the arrow keys.
3. Press the circle key to set the selection.
- 2 - 00 8801 74, 09/2017 (Rev. 5.0)
© T
unst
all G
mbH
, O
rkot
ten
66,
4829
1 T
elgt
e,
Ge
rman
y, w
ww
.tuns
tall.
de
DE - Konfigurationsanleitung EN - Configuration Instructions3. Optionale EinstellungenDie übrigen Menüpunkte bieten optionale Einstellungen. Stel-len Sie diese bei Bedarf ein. Beispiele:
Störungston leise, mittel, laut oder aus
Warnung! Der Ton, der auf Störungen aufmerksam macht, darf nur dann ausgeschaltet werden, wenn sichergestellt ist, dass Störungen auf andere Art sicher angezeigt werden.
1. Mit den Pfeiltasten „Störungston“ markieren; dann Kreistaste drücken.
2. Mit den Pfeiltasten „Leise“, „Mittel“, „Laut“ oder „Aus“ mar-kieren.
3. Kreistaste drücken, um die Auswahl einzustellen.
3. Entering of optional settingsThe remaining menu items provide optional settings. Set these if required. Examples:
Fault tone volume soft, medium, loud or off
WARNING! The tone that attracts attention for a fault may only be turned off, if it is made sure, that the attention is at-tracted in another way.
1. Mark “Fault Tone” using the arrow keys. Then press the circle key.
2. Mark “Soft”, “Medium”, “Loud” or “Off” using the arrow keys.
3. Press the circle key to set the selection.
Tastenfunktion einstellen
Achtung! Ausgeschaltete Tasten sind im Pflegebetrieb nicht verfügbar!
Alarmtaste
In der Werkseinstellung ist die Alarmtaste an der ComStati-onCT funktionsbereit und wird durch kurzes Drücken ausge-löst.
Wenn die Gefahr besteht, dass die Alarmtaste versehentlich ausgelöst wird, kann es sinnvoll sein, eine Verzögerungszeit (2 oder 3 Sekunden) einzustellen. Das heißt, der Alarm wird erst ausgelöst, wenn die Taste für 2 bzw. 3 Sekunden ge-drückt wurde.
Vorsicht! Die Einstellung einer Verzögerungszeit ist nicht konform zu der Norm DIN VDE 0834. Eine Verzögerungszeit darf nur eingestellt werden, wenn Konformität zu der DIN VDE 0834 nicht erforderlich ist.
In begründeten Ausnahmefällen ist es möglich, die Tasten-funktion der Alarmtaste auszuschalten.
Hinweis! Die Alarmtaste ist nur aktiv, wenn die Anwesenheit im Raum eingeschaltet ist.
AW-Taste 1 / AW-Taste 2
In der Werkseinstellung sind beide AW-Tasten (AW = Anwe-senheit) funktionsbereit. In Ausnahmefällen kann es sinnvoll sein, die Tastenfunktion dieser Tasten auszuschalten.
Setting the key function
CAUTION! Switched off keys are not available for nursing staff!
Alarm Key
With the factory settings the alarm key on the ComStationCT is operational and is initiated by pressing it.
If there is the risk, that the alarm button is initiated inadvertent-ly, it might make sense to set a delay time (2 or 3 seconds). In that case the alarm will be initiated after the alarm key has been pressed and then hold for 2 or 3 seconds.
CAUTION! Setting a delay time does not comply with the Ger-man standard DIN VDE 0834. A delay time may only be set, where compliance with the DIN VDE 0834 is not required.
In well-founded exceptional cases you can switch of the alarm key function.
NOTE! Die Alarm Key is only active while the staff presence is switched on in the room.
Presence Key 1 / Presence Key 2
With the factory settings the presence keys are operational. In exceptional cases it may be useful to switch of the key function for these keys.
00 8801 74, 09/2017 (Rev. 5.0) - 3 -
© T
unst
all
Gm
bH,
Ork
otte
n 66
, 482
91 T
elgt
e, G
erm
any
, w
ww
.tun
stal
l.de
DE - Konfigurationsanleitung EN - Configuration Instructions
4. Zimmerbus RAN prüfen
Status
Prüfung, ob die eingestellte RAN-Anzahl (siehe Abschnitt „RAN-Anzahl einstellen“) mit der Anzahl funktionsbereiter Zimmergeräte übereinstimmt.
1. Mit den Pfeiltasten „RAN“ markieren; dann Kreistaste drü-cken.
2. Mit den Pfeiltasten „Status“ markieren; dann Kreistaste drücken.
Anzeige: OK: Die eingestellte RAN Anzahl ist gleich der An-zahl funktionsbereiter Zimmergeräte.
Anzeige: Error (Fehler): Die eingestellte RAN Anzahl ist nicht gleich der Anzahl funktionsbereiter Zimmergeräte.
3. Zum Verlassen der Anzeige Haustaste drücken. Bei Feh-ler (Error) „Test RAN” durchführen.
Test RAN
Test, ob Zimmergeräte funktionsbereit und korrekt am RAN angeschlossen sind.
1. Mit den Pfeiltasten „RAN“ markieren; dann Kreistaste drü-cken.
2. Test starten: Mit den Pfeiltasten „Test RAN“ markieren; dann Kreistaste drücken.
Die LEDs aller angeschlossenen Zimmergeräte müssen blin-ken. Geräte, die nicht blinken, sind falsch angeschlossen oder defekt. Defekte Geräte austauschen. Falsch angeschlossene Geräte korrekt anschließen.
3. Prüfen, ob die Anzahl blinkender Zimmergeräte gleich der eingestellten RAN Anzahl ist. Falls eingestellte RAN-An-zahl falsch ist, diese nach dem RAN Test wie im Abschnitt „RAN Anzahl einstellen“ beschrieben einstellen.
4. Test beenden: Haustaste drücken.
5. Konfigurationsmenü verlassenWenn alle Einstellungen vorgenommen sind und alle Tests beendet sind, müssen Sie das Konfigurationsmenü verlassen:
Haustaste so oft drücken, bis die normale Betriebsanzei-ge angezeigt wird.
Hinweis! Wenn drei Minuten keine Funktionstaste gedrückt wird, wird das Konfigurationsmenü automatisch verlassen.
4. Checking the room bus RAN
Status
Check whether the set RAN number (refer to section “Setting of RAN number”) equals to the number of operational room devices.
1. Mark “RAN” using the arrow keys. Then press the circle key.
2. Mark “Status” using the arrow keys. Then press the circle key.
Display: OK: The set RAN number is equal to the number of operational room devices.
Display: Error: The set RAN number is not equal to the num-ber of operational room devices.
3. Press the home key to end. In case of an error perform a “Test RAN”.
Test RAN
Test if room devices are ready to operate and if they are cor-rectly connected to the RAN.
Check the correct setting of the RAN number.
1. Mark “RAN” using the arrow keys. Then press the circle key.
2. Test start: Mark “Test RAN” using the arrow keys. Then press the circle key.
The LEDs of all connected room devices must flash. Non-flashing devices are wrongly connected or defective. Replace defective devices. Correct any wrong connection.
3. Compare the number of flashing room devices with the set RAN number. If the set RAN number is wrong, correct the RAN number setting after the RAN test as described in section “Setting of RAN number”.
4. End of test: Press the home key.
5. Exit the configuration menuWhen all settings are made and all tests are completed, you have to exit the configuration menu:
Press home key several times until normal operation dis-play appears.
NOTE! If for a period of three minutes no function key is pressed, the system will leave the configuration menu.
- 4 - 00 8801 74, 09/2017 (Rev. 5.0)
© T
unst
all G
mbH
, O
rkot
ten
66,
4829
1 T
elgt
e,
Ge
rman
y, w
ww
.tuns
tall.
de
FR - Notice de configuration EN - Configuration Instructions
ComStationCT Flamenco, réf. 77 0606 00Terminal avec phonie duplex à poser sur la table au poste de soins y compris touche d'appel rouge, touche d'alarme bleue, touche de présence verte (personnel 1), touche de présence jaune (personnel 2), 4 touches de fonction avec affectation en fonction de la situation, microphone et haut-parleurs.
ComStationCT Flamenco, order no. 77 0606 00Terminal with two-way speech communication, designed for desktop installation in the nurse station, incl. red Call Key, blue Alarm Key, green Presence Key (staff 1), yellow Presence Key (staff 2), 4 Function Keys as soft keys, microphone and loudspeakers.
Remarque! L'installation complète du système est dé-crite dans le manuel technique.
Attention verre – fragile! Le panneau frontal du ComStationCT est constitué de verre véritable.
NOTE! The complete installation of the nurse call sys-tem is described in the Technical Manual.
Glass – fragile! The operating front cover of the Com-StationCT is made of glass. Handle with care!
Installation1. Connecter la fiche de connexion [2] du ComStationCT
Flamenco [1] au bloc prise pour ComStation [3].
2. Serrer les deux vis de la fiche [2] pour assurer la fiche contre un desserrage non intentionnel.
Installation1. Connect the connection plug [2] of the ComStationCT Fla-
menco [1] to the connection socket ComStation [3].
2. Tighten the two screws of the connection plug [2], to pro-tect the connection plug against unintentional disconnec-tion.
1 - ComStationCT Flamenco2 - Fiche de connexion
3 - * Bloc prise pour ComStation
1 - ComStationCT Flamenco2 - Connection plug
3 - * Connection socket ComStation
* Non fourni avec le ComStationCT. * Not included with ComStationCT delivery.
1. Démarrer le menu de configuration Appuyer en même temps sur la touche de fonction tout à
fait à gauche et sur la touche de fonction tout à fait à droite (3 sec.) jusqu'à ce que le menu de configuration s'affiche.
1. Start configuration menu Press the left and right function keys simultaneously
(3 sec.) until the configuration menu is shown in the dis-play.
Installation
3
1
2
Symbols in the configuration menu
Downwards arrow key Scroll downwards through the list.
Home key Cancel, without storing.
Upwards arrow key Scroll upwards through the list.
Circle key Set the marked menu item.Symboles dans le menu de configuration
Touche fléchée bas Se déplacer vers le bas dans la liste.
Touche maison Annuler sans sauvegarder.
Touche fléchée haut Se déplacer vers le haut dans la liste.
Touche circulaire Régler le point de menu sélectionné.
Touche d‘alarme
Touche de présence 1 (verte)
Touches de fonction
Touche de
Alarm Key (blue symbol)
Presence Key 1 (green)
Function Keys
Presence Key 2 (yellow)
présence 2 (jaune)
(symbole bleu)
00 8801 74, 09/2017 (Rev. 5.0) - 5 -
© T
unst
all
Gm
bH,
Ork
otte
n 66
, 482
91 T
elgt
e, G
erm
any
, w
ww
.tun
stal
l.de
FR - Notice de configuration EN - Configuration Instructions
Points menu
Langue : Régler la langue du texte affiché.
RAN > Nombre RAN : Régler le nombre d'appareils de chambre (= nombre RAN).
RAN > Test RAN : Test permettant de contrôler si les appa-reils de chambre sont opérationnels et cor-rectement raccordés au bus RAN.
RAN > État : Contrôle si le nombre RAN réglé corres-pond au nombre d'appareils de chambre opérationnels.
Adresse : Régler l'adresse de chambre.
Temps nettoyage : Régler les secondes nécessitées pour l'essuyage du panneau frontal du ComS-tationCT.
Contraste: Uniquement pour technicien Tunstall.
Son des touches: Activer ou désactiver le signal sonore par la pression des touches du ComStationCT. « Son de touches Activé » (réglage usine) est cependant recommandé.
Son d. défauts : Régler le volume du son en cas d'un dé-faut.
Info : Faire afficher la révision du logiciel dans le ComStationCT.
Audio Test : Uniquement pour technicien Tunstall.
Touches : Régler la fonction de la touche d‘alarme et des touches de présence du ComSta-tionCT.
Reset : Uniquement pour technicien Tunstall. (Re-démarrer ComStationCT)
Menu items
Language: Selecting the user language.
RAN > RAN number: Setting of number of room devices (= RAN number).
RAN > Test RAN: Test if room devices are ready to operate and if they are correctly connected to the RAN.
RAN > Status: Check whether the stored RAN number is equal to the number of operational room devices.
Address: Setting of room address.
Cleaning time: Setting the time (seconds) how long it takes to wipe the front of the ComSta-tionCT.
Contrast: Function use only for Tunstall technicians.
Key sound: Switching the key sound on or off. “Key sound ON” (factory setting) is recom-mended.
Fault tone: Setting the fault tone volume.
Info: Displaying the ComStation's software revi-sion.
Audio Test: Function use only for Tunstall technicians.
Key Function: Setting the function of Alarm Key, Pres-ence Key 1 and Presence Key 2 on the ComStationCT.
Reset: Function use only for Tunstall technicians. (Restart the ComStationCT).
2. Réglages impératifs
Régler la langue
1. Sélectionner la « Langue » avec les touches fléchées puis appuyer sur la touche circulaire.
2. Sélectionner la langue souhaitée avec les touches flé-chées : GB = anglais, F = français etc.
3. Appuyer sur la touche circulaire pour régler la sélection.
Régler le nombre RAN (0 – 30)
Nombre RAN = nombre d'appareils de chambre (blocs, bloc prises, hublots de chambre, etc.) raccordés via RAN (pas de poire d'appel, pas de manipulateur).
1. Sélectionner « RAN » avec les touches fléchées puis ap-puyer sur la touche circulaire.
2. Sélectionner « Nombre RAN » avec les touches fléchées puis appuyer sur la touche circulaire.
3. Sélectionner le nombre RAN de la chambre avec les touches fléchées.
4. Appuyer sur la touche circulaire pour régler la sélection.
Régler l'adresse de chambre (0 – 110)
1. Sélectionner « Adresse » avec les touches fléchées puis appuyer sur la touche circulaire.
2. Sélectionner l'adresse souhaitée avec les touches flé-chées.
3. Appuyer sur la touche circulaire pour régler la sélection.
2. Entering of necessary settings
Selecting the user language
1. Mark “Language“ using the arrow keys. Then press thecircle key.
2. Mark the desired language using the arrow keys: D = German; GB = English, etc.
3. Press the circle key to set the selection.
Setting of RAN number (0 – 30) (Room Area Network)
RAN number = Number of devices in the room (switches, con-nection sockets, room lamps, etc.) that are connected via RAN. (No pear push switch, no patient handset).
1. Mark “RAN” using the arrow keys. Then press the circle key.
2. Mark “RAN number” using the arrow keys. Then press the circle key.
3. Mark the desired RAN number using the arrow keys.
4. Press the circle key to set the selection.
Setting of room address (0 – 110)
1. Mark “Address” using the arrow keys. Then press the cir-cle key.
2. Mark the desired room address using the arrow keys.
3. Press the circle key to set the selection.
- 6 - 00 8801 74, 09/2017 (Rev. 5.0)
© T
unst
all G
mbH
, O
rkot
ten
66,
4829
1 T
elgt
e,
Ge
rman
y, w
ww
.tuns
tall.
de
FR - Notice de configuration EN - Configuration Instructions3. Effectuer les réglages en optionLes points menu restants fournissent des réglages optionnels. Réglez-les si nécessaire. Exemples :
Son de défauts bas, moyen, fort ou désactivé
Avertissement ! Le son qui attire l'attention sur les défauts doit seulement être désactivé s'il est garanti que les défauts sont affichés fiablement d'une autre manière.
1. Sélectionner « Son d. défauts » avec les touches flé-chées puis appuyer sur la touche circulaire.
2. Sélectionner « Bas », « Moyen », « Fort » ou « Désactivé » avec les touches fléchées.
3. Appuyer sur la touche circulaire pour régler la sélection.
3. Entering of optional settingsThe remaining menu items provide optional settings. Set these if required. Examples:
Fault tone volume soft, medium, loud or off
WARNING! The tone that attracts attention for a fault may only be turned off, if it is made sure, that the attention is at-tracted in another way.
1. Mark “Fault Tone” using the arrow keys. Then press the circle key.
2. Mark “Soft”, “Medium”, “Loud” or “Off” using the arrow keys.
3. Press the circle key to set the selection.
Régler la fonction des touches
Avertissement ! Les touches désactivées ne sont pas dispo-nibles pour le personnel de soins et les patients !
Touche d'alarme
En réglage usine, la touche d'alarme est opérationnelle et est déclenchée par une pression brève.
Lorsqu'il y a un risque de déclenchement accidentel de la touche d'alarme, il peut s'avérer utile de régler le temps de re-tardement (2 ou 3 secondes). Cela signifie que l'alarme est seulement déclenchée lorsque la touche a été appuyé pen-dant 2 ou 3 secondes.
Attention ! Le réglage d'un temps de retardement n'est pas conforme à la norme allemande DIN VDE 0834. Un temps de retardement ne peut être réglé que si la conformité à la norme DIN VDE 0834 n'est pas requise.
Dans des cas exceptionnels fondés, il est possible de désac-tiver la fonction de la touche d'alarme.
Remarque ! La touche d'alarme est seulement actif lorsque la présence dans la chambre est activée.
Touches de présence Personnel 1 / Personnel 2
En réglage usine, les deux touches de présence sont opéra-tionnelles. Dans des cas exceptionnels fondés, il est possible de désactiver la fonction de ces touches.
Setting the key function
CAUTION! Switched off keys are not available for nursing staff!
Alarm Key
With the factory settings the alarm key on the ComStationCT is operational and is initiated by pressing it.
If there is the risk, that the alarm button is initiated inadvertent-ly, it might make sense to set a delay time (2 or 3 seconds). In that case the alarm will be initiated after the alarm key has been pressed and then hold for 2 or 3 seconds.
CAUTION! Setting a delay time does not comply with the Ger-man standard DIN VDE 0834. A delay time may only be set, where compliance with the DIN VDE 0834 is not required.
In well-founded exceptional cases you can switch of the alarm key function.
NOTE! Die Alarm Key is only active while the staff presence is switched on in the room.
Presence Key 1 / Presence Key 2
With the factory settings the presence keys are operational. In exceptional cases it may be useful to switch of the key function for these keys.
00 8801 74, 09/2017 (Rev. 5.0) - 7 -
© T
unst
all
Gm
bH,
Ork
otte
n 66
, 482
91 T
elgt
e, G
erm
any
, w
ww
.tun
stal
l.de
FR - Notice de configuration EN - Configuration Instructions
4. Contrôler bus de chambre RAN
État
Contrôle si le nombre RAN réglé (voir section « Régler le nombre RAN ») correspond au nombre d'appareils de chambre opérationnels.
1. Sélectionner « RAN » avec les touches fléchées puis ap-puyer sur la touche circulaire.
2. Sélectionner « État » avec les touches fléchées puis ap-puyer sur la touche circulaire.
Affichage OK : Le nombre RAN réglé est identique à celui des appareils de chambre opérationnels.
Affichage Error (erreur): Le nombre RAN réglé n'est pas iden-tique à celui des appareils de chambre opérationnels.
3. Appuyer sur touche maison pour quitter l'affichage. Effec-tuer « Test RAN » en cas d'un erreur (ERROR).
Test RAN
Test permettant de contrôler si les appareils de chambre sont opérationnels et correctement raccordés au RAN.
1. Sélectionner « RAN » avec les touches fléchées puis ap-puyer sur la touche circulaire.
2. Démarrer test : Sélectionner « Test RAN » avec les touches fléchées puis appuyer sur la touche circulaire.
Les LED de tous les appareils de chambre raccordés doivent clignoter. Les appareils qui ne clignotent pas sont mal raccor-dés ou défectueux. Remplacer les appareils défectueux. Rac-corder correctement les appareils mal raccordés.
3. Contrôler si le nombre d'appareils de chambre raccordés est identique à celui des RAN réglés. Si le nombre RAN réglé est erroné, régler ce dernier d'après le test RAN comme décrit dans le section « Régler le nombre RAN ».
4. Terminer test : Appuyer sur la touche maison.
5. Quitter le menu de configurationLorsque tous les réglages sont effectués et tous les tests sont terminés, vous devez quitter le menu de configuration.
Appuyer plusieurs fois sur la touche maison jusqu'à ce que l'affichage de service normal s'affiche.
Remarque ! Si aucun touche de fonction n'est appuyé pen-dant trois minutes, le menu de configuration est quitté auto-matiquement.
4. Checking the room bus RAN
Status
Check whether the set RAN number (refer to section “Setting of RAN number”) equals to the number of operational room devices.
1. Mark “RAN” using the arrow keys. Then press the circle key.
2. Mark “Status” using the arrow keys. Then press the circle key.
Display: OK: The set RAN number is equal to the number of operational room devices.
Display: Error: The set RAN number is not equal to the num-ber of operational room devices.
3. Press the home key to end. In case of an error perform a “Test RAN”.
Test RAN
Test if room devices are ready to operate and if they are cor-rectly connected to the RAN.
Check the correct setting of the RAN number.
1. Mark “RAN” using the arrow keys. Then press the circle key.
2. Test start: Mark “Test RAN” using the arrow keys. Then press the circle key.
The LEDs of all connected room devices must flash. Non-flashing devices are wrongly connected or defective. Replace defective devices. Correct any wrong connection.
3. Compare the number of flashing room devices with the set RAN number. If the set RAN number is wrong, correct the RAN number setting after the RAN test as described in section “Setting of RAN number”.
4. End of test: Press the home key.
5. Exit the configuration menuWhen all settings are made and all tests are completed, you have to exit the configuration menu:
Press home key several times until normal operation dis-play appears.
NOTE! If for a period of three minutes no function key is pressed, the system will leave the configuration menu.
- 8 - 00 8801 74, 09/2017 (Rev. 5.0)